
The problem
At OSOCO we use AWS extensively. In particular, we use CloudFormation to describe the infrastructure for each platform.
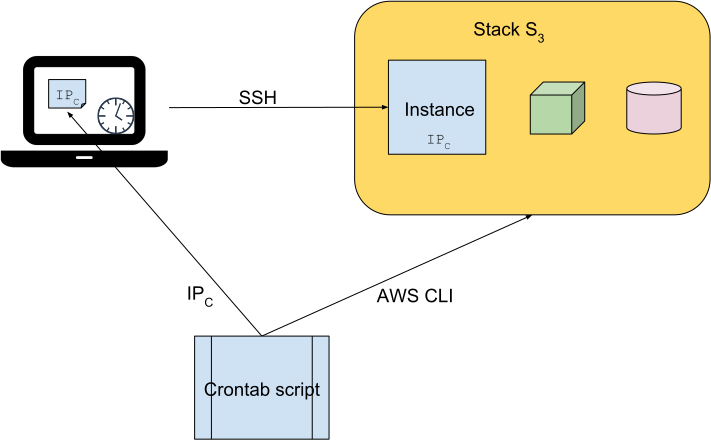
A typical scenario could be as follows.

In order to connect to the instance, we need to find out its IP address first. Once we
know it, we change our ${HOME}/.ssh/config to add something like:
Host [instance-name]
  User ec2-user
  StrictHostKeyChecking no
  IdentityFile ~/.ssh/[aws-private-key].pem
  Hostname [IPa]
However, the CloudFormation stack the instance belongs to can be shut down and another one be launched instead.

In this case, we typically first try to connect to the new instance, and, when we check it fails, we start over finding the new IP and manually updating our SSH client configuration.
Better off, we can automate the way we retrieve the new IP with the help of AWS CLI.

One way or another, once our SSH client configuration points to the new IP, we can connect to the instance again.

So far so good. However, what if this scenario happens regularly? We end up doing tedious tasks and wasting time when we usually have important reasons to connect to the instance in the first place.
Over time, we at OSOCO have come to agree on certain “best practices” or “patterns”. We’ve seen how our CloudFormation templates have evolved after applying those patterns over time.
One of those “best practices” means declaring a DNS record for each EC2 instance in its CloudFormation stack, and include it as part of its outputs. We discourage the use of Elastic IPs unless a client requires it. Using custom DNS entries saves us the need to modify the SSH client configuration ourselves.
Not all our stacks follow this approach, though.
And it doesn’t solve the problem in all situations. For example, what if you’re working remotely, and the CloudFormation stacks allow SSH access only from the office’s IP? You’ll need to add a new entry in your routing table so that traffic to the EC2 goes through the VPN to the office:
route add -host [instance-dns-entry] [vpn-interface]
And don’t forget you’ll need to do it every time you reboot your box, for every one of your instances.
Our in-house solution
At OSOCO we’ve built some tools in-house to help us in our AWS duties, including this.
Instead of checking the IP of the instance using the AWS Console, we leverage the AWS-CLI to automatically create shell aliases based on the profile and EC2 instance combination.
Since it’s composed of independent hacks and snippets, it’s not something we could easily package as a tool for you to download. Right now, to use it you’ll need to understand it first, and then probably customize it to your needs.
In summary, this solution consists of synchronizing our AWS profiles, CloudFormation stacks, and SSH client
configuration using a cron job, and providing convenient shell aliases like ssh-[ec2-instance] to connect
to every EC2 instance without caring about the instance’s IP address.
Try it yourself
Should you are interested in trying out this approach, we’ll show you each part of the
puzzle. But the big picture consists of a single file (~/.aws-aliases) you’ll need to run each time you
log in, and a cron job that makes sure those aliases are in sync with your EC2 instances.
In addition to the ssh-[instance-name] aliases, you’ll be able to run [instance-name]-ip to print
(and copy to the clipboard) the instance’s IP address.
If your stacks include SecurityGroups preventing you from connecting from anywhere but the office’s IP, and
you are out of the office, you’ll need to setup a VPN and export a variable AWS_VPN_INTERFACE
containing the name of the network interface the VPN creates.
To make all this work, we’ll focus on the script to run using a cron job: ${HOME}/.aws-helper-functions.sh.
The first step is to define a shell function to avoid us to repeat the information about
the AWS profile again and again. We included a minor hack to include --no-include-email
when running aws ecr get-login, but besides that, it just appends --profile profile
to the aws executable.
## Runs AWS CLI using given profile, and uses "--no-include-email" if we try to
## run ecr get-login.
## Parameters:
## -> 1: The AWS profile.
## Returns:
## - The result of running AWS CLI.
## Example:
##   aws-shortcut "prof1" ecr get-login
function aws-shortcut() {
  [ $# -lt 2 ] && echo "Usage: aws-shortcut profile cmd+" && return 1;
  local profile="${1}";
  shift;
  local first="${1}";
  local second="";
  if [ $# -ge 2 ]; then
      shift;
      second="${1}";
  fi
  shift;
  local aux="";

  if [[ "${first}" == "ecr" ]] && [[ "${second}" == "get-login" ]]; then
      aux="--no-include-email";
  fi

  aws --profile "${profile}" "${first}" "${second}" "${aux}" $@;
}
Our solution is not constrained to any specific AWS profile. To work for each profile you might have configured AWS-CLI already, we’ll make use of a helper function to list them all.
## Retrieves the list of AWS Profiles already configured,
## based on the contents of ${HOME}/.aws/config.
## Returns:
## - 0 If the profiles were found; 1 otherwise.
## Example:
##   if list-aws-profiles; do
##     for profile in ${RESULT}; do
##       echo "AWS Profile found: ${profile}";
##     done
##   fi
function list-aws-profiles() {
  local -i rescode;
  local result="$(cat ${HOME}/.aws/config | grep '\[profile ' | sed 's|\[profile ||g' | tr -d ']')";
  rescode=$?;

  if [ ${rescode} -eq 0 ]; then
      export RESULT="${result}";
  fi

  return ${rescode};
}
Now, we need a function to create aliases for each one of your AWS profiles:
## Declares shell aliases to run aws-shortcut for each AWS profile found.
## Parameters:
## - 1: The file to write the aliases to.
## Returns:
## - 0 If any shell alias was created; 1 otherwise.
## Example:
##   if generate-aws-profile-aliases ${HOME}/my-aliases; then
##     echo "AWS profile aliases generated successfully in ${HOME}/my-aliases.";
##   fi
function generate-aws-profile-aliases() {
  local -i rescode=1;
  local file="${1}";

  [ -z "${file}" ] && echo "Usage: generate-aws-profile-aliases [file]" && return ${rescode};
  if [ ! -e "${file}" ]; then
    touch "${file}";
    [ $? -ne 0 ] && echo "Error: Cannot write to ${file}" && return ${rescode};
  fi
  local p;

  echo -n "Generating AWS profile aliases ... "
  if list-aws-profiles; then
    local oldIFS="${IFS}";
    IFS=$' \t\n';
    if [ ${ZSH_VERSION} ]; then
        setopt sh_word_split
    fi
    for p in ${RESULT}; do
      echo "alias aws-${p}=\"aws-shortcut ${p}\";" >> ${file}
      rescode=0;
    done
    IFS="${oldIFS}";
  fi
  echo "done";

  return ${rescode};
}
At this point, by running generate-aws-profile-aliases, we’ll be generating some aliases to run AWS CLI a bit more comfortably.
Those aliases are not particularly helpful, but they allow us to run $(aws-[profile] ecr get-login) whenever we want to pull
or push Docker images from or to our ECR repositories.
The next step is a function to retrieve all running EC2 instances dynamically. It’ll come in handy later. Here’s a function to accomplish it:
## Retrieves the running EC2 instances.
## Parameters:
## - 1: The AWS profile.
## Returns:
## - 0 If the EC2 instances could be listed; 1 Otherwise.
## - RESULT: A space-separated list with the names of the EC2 instances.
## Example:
##   if list-ec2-instances "prof1"; then
##     local oldIFS="${IFS}";
##     IFS=$' \t\n';
##     if [ ${ZSH_VERSION} ]; then
##       setopt sh_word_split
##     fi
##     for i in ${RESULT}; do
##       echo "EC2 instance: ${i}"
##     done
##     IFS="${oldIFS}";
##   fi
function list-ec2-instances() {
  local -i rescode=1;
  local profile="${1}";

  [ -z "${profile}" ] && echo "Usage: list-ec2-instances [aws-profile]" && return ${rescode};

  local result="$(aws --profile ${profile} ec2 describe-instances --query "Reservations[].Instances[]" 2> /dev/null | jq ".[] | select(.State.Name = \"running\") | .Tags[] | select(.Key == \"Name\") | .Value" | tr -d '"')";
  rescode=$?;

  if [ ${rescode} -eq 0 ]; then
      export RESULT="${result}";
  fi

  return ${rescode};
}
Another function that we’ll need later uses AWS-CLI to find out the IP of an EC2 instance:
## Retrieves the IP of given EC2 instance.
## Parameters:
## - 1: The instance name.
## - 2: The name of the AWS profile.
## Returns:
##   0: If the IP was found;
##   1: Otherwise
## Example:
##   if retrieve-ec2-ip nginx prof1; then
##     echo "IP of nginx in prof1: ${RESULT}";
##   fi
function retrieve-ec2-ip() {
  local -i rescode=1;
  local resource="${1}";
  local profile="${2}";

  [ -z "${resource}" ] && echo "Usage: retrieve-ec2-ip [resource] [aws-profile]" && return ${rescode};
  [ -z "${profile}" ] && echo "Usage: retrieve-ec2-ip [resource] [aws-profile]" && return ${rescode};

  local result="$(aws --profile ${profile} ec2 describe-instances --query "Reservations[].Instances[]" 2> /dev/null | jq ".[] | select(.Tags[].Value | test(\"^${resource}$\"; \"i\")) | .PublicIpAddress" | sort | uniq | grep -v null | tr -d '"' | head -n 1)";
  rescode=$?;

  if [ ${rescode} -eq 0 ]; then
      export RESULT="${result}";
  else
    export RESULT="";
  fi

  return ${rescode};
}
Those of you working remotely will need to add new entries to their route table for every EC2 instance. That’s what the next function is about:
## Adds a new route to given IP, using given VPN interface.
## Parameters:
## - 1: The vpn interface.
## - 2: The IP address.
## Returns:
## - 0 If the route was created; 1 otherwise.
## Example:
##   if add-route-to-host tun0 8.8.8.8; then
##     echo "Route created successfully";
##   fi
function add-route-to-host() {
  local vpnInterface="${1}";
  local ip="${2}";
  local -i rescode=1;

  [ -z "${vpnInterface}" ] && echo "Usage: add-route-to-host [vpn-interface] [ip]" && return ${rescode};
  [ -z "${ip}" ] && echo "Usage: add-route-to-host [vpn-interface] [ip]" && return ${rescode};

  ifconfig ${vpnInterface} > /dev/null 2>&1;
  rescode=$?;

  if [ ${rescode} -eq 0 ]; then
    sudo route add -host ${ip} ${vpnInterface} > /dev/null 2>&1;
    rescode=$?;
  echo
    "Error: No interface ${vpnInterface} found";
  fi

  return ${rescode};
}
Now we’re ready to deal with configuring the SSH client options.
Instead of managing them all in your ${HOME}/.ssh/config, we suggest another approach.
We’ll regenerate the ${HOME}/.ssh/config file regularly, by concatenating all files
in ${HOME}/.ssh ending in .config.
At this point, rename your ${HOME}/.ssh/config to ${HOME}/.ssh/misc.config (the name is
unimportant as long as doesn’t collide with the ones we’ll autogenerate later) and edit it
to remove any hosts related to your AWS instances.
Notice we’ll assume your private key is stored in ~/.ssh/[profile].pem.
You’ll need to create symlinks or change yours accordingly. Also, be aware of your
ssh-agent, which might be full of cached identities and ignoring your private key anyway.
In that case, run ssh-add -D and try connecting again.
Some of these .config files will be actually created by this AWS helper function:
## Updates the SSH client configuration to connect to given EC2 instance.
## Parameters:
## - 1: The resource name.
## - 2: The name of the AWS profile.
## - 3: The IP. Optional.
## Environment variables:
## - AWS_VPN_INTERFACE: The name of the interface to be use to route all traffic
##   to the AWS resource. This is usually needed when your SecurityGroups include
##   specific CIDRs.
## Returns:
##   0: If the configuration has been updated successfully;
##   1: if the parameters are invalid;
##   2: If the configuration wasn't changed for some reason.
## Example:
##   if update-ec2-ssh nginx clientX; then
##     echo "SSH configuration for nginx (pre) in clientX account updated successfully";
##   fi
function update-ec2-ssh() {
  local -i rescode=1;
  local resource="${1}";
  local profile="${2}";
  local ip="${3}";

  [ -z "${resource}" ] && echo "Usage: update-ec2-ssh [resource] [aws-profile]" && return ${rescode};
  [ -z "${profile}" ] && echo "Usage: update-ec2-ssh [resource] [aws-profile]" && return ${rescode};
  for s in jq ssh-keygen ssh-keyscan; do
    which ${s} 2> /dev/null > /dev/null;
    rescode=$?;
    if [ ${rescode} -ne 0 ]; then
      echo "Skipping update-ec2-ssh"
      return ${rescode};
    fi
  done

  local file="${HOME}/.ssh/${profile}-${resource}.config";
  if [ -z "${ip}" ]; then
    echo -n "Retrieving ${resource}'s IP ... ";
    if retrieve-ec2-ip "${resource}" "${profile}"; then
        ip="${RESULT}";
        echo "${ip}";
        rescode=0;
    else
      echo "Failed";
      echo "Error: Cannot retrieve ${resource}'s IP address (using ${profile} profile)";
      return ${rescode};
    fi
  fi

  if [ -e ${file} ]; then
    if [ -z "${ip}" ]; then
      ip="$(grep Hostname ${file} | awk '{print $2;}')";
    fi
  else
    cat <<EOF > ${file}
Host ${profile}-${resource}
  User ec2-user
  StrictHostKeyChecking no
  IdentityFile ~/.ssh/${profile}.pem
  Hostname ${ip}
EOF
    ssh-keygen -R ${ip} > /dev/null 2> /dev/null
    ssh-keyscan -H ${ip} >> ${HOME}/.ssh/known_hosts 2> /dev/null
    head -n -1 ${file} > /tmp/.${resource}.config
    echo "  Hostname ${ip}" >> /tmp/.${resource}.config
    mv -f /tmp/.${resource}.config ${file}
    rm -f ${HOME}/.ssh/config
    cat ${HOME}/.ssh/*.config > ${HOME}/.ssh/config
  fi

  which xclip 2> /dev/null > /dev/null && echo -n ${ip} | xclip
  echo -n "Adding route for ${ip} ... ";
  add-route-to-host "${AWS_VPN_INTERFACE}" "${ip}" 2> /dev/null > /dev/null
  echo "done";

  return ${rescode};
}
This function expects 2 arguments: the name of the EC2 instance and the name of the AWS profile (as defined in your
${HOME}/.aws/credentials).
After some validations, it uses AWS CLI to get information about the instance. AWS CLI provides this information in JSON format. We use jq to extract the IP address from it.
Then, if everything went fine, we check if the SSH configuration file for the requested instance exists.
If it’s missing, we create it with some default settings.
Otherwise, we modify the last line with the new Hostname [new-ip] entry.
The script prints the new IP, copies it to the clipboard, and adds the new route to the route table if we access the EC2 instances via a VPN.
Now we need another step: dynamically generate shell aliases to update the SSH configurations for each EC2 instance.
## Generates the EC2 SSH aliases for a given profile in a file.#
## Parameters:
## - 1: The AWS profile name.
## - 2: The file to write the aliases to.
## Returns:
## - 0 If the SSH alias get generated; 1 Otherwise.
## Example:
##   if generate-ec2-ssh-aliases-for-profile "prof1" ${HOME}/my-aliases; then
##     echo "SSH aliases generated for your EC2 instances in prof1, in ${HOME}/my-aliases.";
##   fi
function generate-ec2-ssh-aliases-for-profile() {
  local -i rescode=1;
  local profile="${1}";
  local file="${2}";
  local i;
  local ip;

  [ -z "${profile}" ] && echo "Usage: generate-ec2-ssh-aliases-for-profile [aws-profile] [file]" && return ${rescode};
  [ -z "${file}" ] && echo "Usage: generate-ec2-ssh-aliases-for-profile [aws-profile] [file]" && return ${rescode};
  if [ ! -e "${file}" ]; then
      echo -n > "${file}";
      if [ $? -ne 0 ]; then
         echo "Error: Cannot write to ${file}";
         echo "Usage: generate-ec2-ssh-aliases-for-profile [aws-profile] [file]";
         return ${rescode};
      fi
  fi

  echo -n "Retrieving the list of EC2 instances for profile ${profile} ... "
  if list-ec2-instances "${profile}"; then
      echo "done";
      local oldIFS="${IFS}";
      IFS=$' \t\n';
      if [ ${ZSH_VERSION} ]; then
          setopt sh_word_split
      fi
      for i in ${RESULT}; do
        echo -n "Retrieving IP for ${i}: ";
        if retrieve-ec2-ip ${i} ${profile}; then
            ip="${RESULT}";
            echo "${ip}";
            echo "alias ${profile}-${i}-ip=\"echo -n ${ip} | xclip 2> /dev/null; echo ${ip}\";" >> ${file}
            echo "alias ssh-${profile}-${i}=\"add-route-to-host "${AWS_VPN_INTERFACE}" "${ip}" > /dev/null 2>&1; ssh ${profile}-${i} || (update-ec2-ssh ${i} ${profile} ${ip}; ssh ${profile}-${i} || (update-ec2-ssh ${i} ${profile}; ssh ${profile}-${i}))\";" >> ${file}
            update-ec2-ssh ${i} ${profile} ${ip};
        fi
      done
      IFS="${oldIFS}";
  fi
}
To generate all aliases for all EC2 instances in all your AWS profiles, we just need to call the function above for all your AWS profiles:
## Generates EC2 SSH aliases for all AWS profiles in a file.
## Parameters:
## - 1: The file to write the aliases to.
## Returns:
## - 0 If the aliases get generated correctly; 1 Otherwise.
## Example:
##   if generate-all-ec2-ssh-aliases ${HOME}/my-aliases; then
##     echo "Shell aliases generated for all AWS profiles in ${HOME}/my-aliases."
##   fi
function generate-all-ec2-ssh-aliases() {
  local -i rescode=1;
  local file="${1}";
  local awsProfiles;

  [ -z "${file}" ] && echo "Usage: generate-all-ec2-ssh-aliases [file]" && return ${rescode};
  [ ! -e "${file}" ] && echo -n > "${file}";
  if [ ! -e "${file}" ]; then
      echo -n > "${file}";
      if [ $? -ne 0 ]; then
          echo "Error: Cannot write to ${file}";
          echo "Usage: generate-all-ec2-ssh-aliases [file]";
          return ${rescode};
      fi
  fi

  echo -n "Retrieving AWS profiles ... ";
  if list-aws-profiles; then
      echo "done";
      local oldIFS="${IFS}";
      IFS=$' \t\n';
      if [ ${ZSH_VERSION} ]; then
          setopt sh_word_split
      fi
      for awsProfile in ${RESULT}; do
        if generate-ec2-ssh-aliases-for-profile "${awsProfile}" "${file}"; then
            rescode=0;
        else
          rescode=1;
          break;
        fi
      done
      echo "Regenerated SSH configurations for all EC2 instances in ${file}";
      IFS="${oldIFS}";
  fi

  return ${rescode};
}
We’re almost done. For convenience, we suggest to create a new file ${HOME}/.aws-stuff.sh:
#!/bin/bash

AWS_VPN_INTERFACE="tun0"; # Change this to fit your context.
AWS_ALIASES="${HOME}/.aws-aliases";

[ -e "${AWS_ALIASES}" ] && source ${AWS_ALIASES}

source ${HOME}/.aws-helper-functions.sh

## Regenerates all AWS-related aliases.
function regenerate-aws-aliases() {
  rm -f "${AWS_ALIASES}"
  generate-aws-profile-aliases ${AWS_ALIASES}
  generate-all-ec2-ssh-aliases ${AWS_ALIASES}
}
We just need to add ${HOME}/.aws-stuff.sh file in our login script, and run generate-all-ec2-ssh-aliases
every time we redeploy a stack:
[..]

[ -e "${HOME}/.aws-stuff.sh" ] && source ${HOME}/.aws-stuff.sh

[..]
Thanks to autocompletion, when you need to connect to one of your EC2 instances,
you can just type ssh-, press TAB, and get the complete list for you.
We can now schedule the rate at which we regenerate the aliases file to roughly match the frequency your IPs change. Should once a day might suffice for you:
0 11 * * * [user] /home/${user}/.aws-ssh-refresh.sh
The script ${HOME}/.aws-ssh-refresh.sh is just:
#!/bin/bash

source ${HOME}/.aws-stuff.sh
regenerate-aws-aliases
Please share your feedback below, or reaching out to @osoco in Twitter.
Credits
- Images courtesy of Pixabay, licensed under CC0 Creative Commons.